
Putting together a trampoline might seem like a big job, but with the right guidance, it's totally doable. Here are the main things to remember from your instruction manual trampoline guide:
Key Takeaways
- Always start by reading the entire instruction manual trampoline guide before you begin.
- Check that all parts are present and organized before assembly.
- Assemble the frame first, then attach the legs securely.
- Attach the jumping mat and springs evenly, using the provided tools.
- Install safety features like the pad and enclosure net for a secure setup.
Understanding Your Trampoline Instruction Manual

Importance of Reading the Instruction Manual
Okay, so you've got a brand new trampoline, and the urge to start bouncing is probably pretty strong. I get it! But before you even think about that first epic jump, let's talk about the instruction manual. It might seem like a boring booklet, but seriously, this is the most important part before you even unbox anything. Skipping this step is like trying to bake a cake without looking at the recipe – you might end up with something edible, but it's probably not going to be great, and it could even be a mess. The manual is your roadmap to a safe and properly assembled trampoline. It's where you'll find all the nitty-gritty details that keep things from going sideways. Think of it as your first line of defense against wobbly frames or springs that just don't feel right. You can find a lot of helpful information in these manuals, including details about the product warranty, which is usually tucked away on the last page [08a1].
What to Expect in Your Trampoline Manual
So, what's actually in this manual? Well, it's not just a few pictures. You'll typically find a breakdown of every single part that came in the box. This is super handy for making sure nothing's missing right from the start. Then comes the assembly part, usually laid out step-by-step with diagrams. They'll show you how the frame pieces connect, how to attach the mat, and where all those springs go. It's also where you'll find the manufacturer's recommendations for how to best set it up. Some manuals even include tips for maintenance and care to keep your trampoline in good shape for years to come. It's a good idea to spread out all the parts and organize them before you start [7a70].
Safety Warnings and Precautions
This is the section you absolutely cannot skim over. Trampolines are awesome, but they do come with risks if not set up or used correctly. The manual will have a dedicated section for safety warnings. This covers everything from how to properly assemble the trampoline to avoid injury, to rules for jumping once it's set up. You'll find information about weight limits, the importance of adult supervision, and what to do if a part seems damaged. Pay close attention to any warnings about weather conditions or placement of the trampoline. They might seem obvious, but it's always better to be reminded. It's also a good place to check for recommended tools, like a spring pulling device or a rubber mallet, which can make assembly much easier and safer.
Reading the manual thoroughly before starting assembly is the best way to ensure a safe and enjoyable experience. It's not just about putting pieces together; it's about understanding how they fit and why they're important for the overall structure and safety of the trampoline.
Preparing for Trampoline Assembly
Alright, so you've got your shiny new trampoline box (or maybe boxes!) sitting there, practically begging to be assembled. It's tempting to just rip into it and start putting things together, but hold up a sec. Taking a little time now to get organized will save you a ton of headaches later. Think of it like prepping ingredients before you start cooking – way less stressful!
Checking All Package Contents
First things first, let's make sure you actually have everything you need. Trampoline boxes can be packed pretty full, and sometimes things get missed. Carefully unpack all the boxes and lay out every single piece. Compare what you have against the parts list in your manual. Don't just glance at it; go through each item. If something's missing, it's much easier to deal with it now before you're halfway through assembly and realize you can't continue. Contacting the manufacturer right away is your best bet if a part is MIA. You can find a general guide on setting up your trampoline that might help you visualize what you should be seeing.
Organizing Trampoline Parts
Once you've confirmed you have all the bits and bobs, it's time to get them sorted. Trust me, a giant pile of metal tubes, springs, and pads is not your friend. Take a few minutes to group similar items together. Put all the frame pieces in one area, the legs in another, and keep the springs and safety pad separate. Some parts might look alike but are actually different, so pay attention to the manual's diagrams. This step makes finding what you need during assembly super quick.
Gathering Necessary Tools
Your trampoline manual will usually list the tools you'll need. Most trampolines don't require a whole workshop, but having the right tools handy makes the job go smoother. You'll likely need:
- A Phillips head screwdriver or a power drill (a drill makes things go much faster).
- A rubber mallet (for gently tapping parts into place).
- The spring puller tool (this usually comes with the trampoline, and it's a lifesaver for attaching those springs).
- Work gloves (seriously, your hands will thank you when dealing with those springs).
It's always a good idea to have a helper for assembly. Many steps, like flipping the frame or attaching springs, are much easier and safer with an extra pair of hands. Plus, it makes the whole process less of a chore and more of a team effort. You can find more detailed assembly steps in guides like this one.
Having everything checked, organized, and ready to go means you're setting yourself up for a successful and safe trampoline build. No one wants to be halfway through and realize they're missing a critical bolt or tool!
Assembling the Trampoline Frame
Alright, let's get this trampoline frame put together. This is where things start to look like a trampoline, so it's pretty exciting. First things first, you'll want to lay out all those circular frame pieces. They usually just snap or slide together. Make sure each connection is snug before moving on. You're basically building a big metal ring on the ground right now.
Next up are the legs. These should have specific spots on the frame where they attach. Sometimes they slide right in, and other times you might need to give them a gentle tap with a rubber mallet. Just be careful not to go too wild with the hammer; a soft touch is best here. Once the legs are on, it's time to really tighten things up. Grab your screwdriver or power drill and secure all the bolts and screws. Double-check everything to make sure it's solid. A wobbly frame is no fun, and it's way easier to fix it now than later.
Connecting the Circular Frame Pieces
This is the foundation of your trampoline. You'll typically have several curved metal sections that form the main circle. They usually have a simple connection system, like pins that slot into holes or tubes that slide into each other. Take your time to connect them all, ensuring each piece is fully seated. It's important that this ring is perfectly round and flat on the ground before you attach anything else.
Attaching the Trampoline Legs
Once your circular frame is complete, it's time to add the legs. These usually attach to the frame at designated points, often with bolts or by sliding into a socket. Some designs might require you to attach the legs to the circular frame before you connect all the circular pieces, so check your specific manual. If the legs are a bit stubborn, a rubber mallet can help, but use it gently. The goal is a secure fit without damaging the parts.
Securing Frame Components with Hardware
Now that the basic frame and legs are in place, it's time to make it all sturdy. This involves using the provided bolts, nuts, and washers. You'll want to go around and tighten every single piece of hardware. A power drill can speed this up, but be careful not to overtighten and strip the threads. It's a good idea to have a helper for this step, especially when you need to flip the frame over onto its legs. Make sure it sits level and doesn't wobble. If it does, re-check all your connections. Getting the frame right is key to a safe trampoline setup.
Here's a quick rundown of what you'll need for this stage:
- Circular Frame Sections: The main curved pieces.
- Legs: The supports that hold the trampoline up.
- Hardware: Bolts, nuts, washers, and any other connectors.
- Tools: Screwdriver or power drill, rubber mallet (optional).
Remember, a solid frame is the backbone of a safe and fun trampoline. Don't rush this part. Take the time to ensure every connection is tight and every piece is correctly aligned. It makes all the difference later on.
Attaching the Jumping Mat and Springs
Alright, so you've got the frame all put together. Now comes the part where things really start to look like a trampoline: attaching the mat and those all-important springs. This step can be a bit of a workout, so don't be afraid to ask for a hand if you have one available. It's way easier with two people, especially when you get to the tougher springs.
Positioning the Jumping Mat
First things first, lay the jumping mat out flat inside the assembled frame. Make sure it's centered up as best as you can. You'll see a bunch of little loops or eyelets all around the edge of the mat. These are where the springs are going to hook up. Just get it roughly in place for now; the springs will help pull it taut and into its final position.
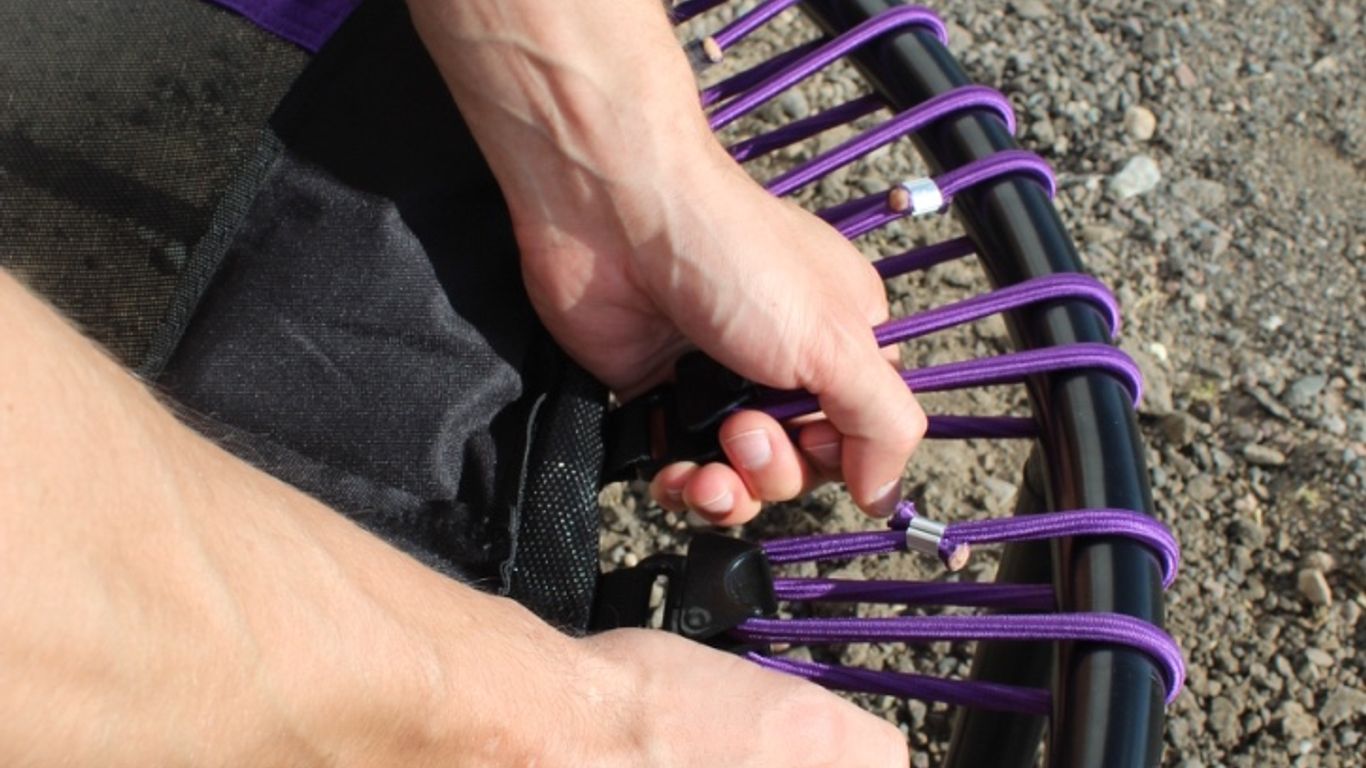
Using the Spring Puller Tool
This is where that special tool, the spring puller, comes in handy. It's basically a handle with a hook on the end. You'll use it to grab one end of a spring, hook it onto the metal ring on the mat, and then use the tool to pull the other end of the spring over to the corresponding hook on the trampoline frame. It gives you a bit of leverage, which you'll definitely need. Trying to stretch those springs by hand is a recipe for sore fingers and frustration.
Evenly Distributing Springs for Optimal Tension
This is probably the most important part of getting the mat attached correctly. You can't just go around attaching springs randomly. You need to work your way around the trampoline, attaching springs in an even pattern. Think of it like tightening lug nuts on a car wheel – you go across from each other. Start by attaching a spring on one side, then go directly across and attach another. Continue this pattern, moving around the circle. This helps distribute the tension evenly across the mat and frame. If you skip around too much, you'll end up with a lopsided mat and uneven bounce. It'll get harder to attach the springs as you go, especially once you're about halfway done, because the mat will be getting pretty tight. Just keep at it, and use that spring puller tool.
Attaching the springs evenly is key to a good bounce and making sure the mat doesn't get stressed in one area. Take your time with this step and don't force anything if it feels really wrong.
Here's a quick rundown of the process:
- Grab a spring and hook one end into a loop on the jumping mat.
- Use the spring puller tool to stretch the spring.
- Hook the other end of the spring onto a frame hook, working across from the previous spring.
- Repeat this process, moving around the trampoline in an even pattern.
If you're having trouble finding the right spot for a spring, double-check that you're using the correct hooks on the frame and that the mat is still roughly centered. Sometimes, you might need to adjust a few already-attached springs to get the last few in place. For a visual guide on how to attach a trampoline mat, you can check out this guide.
Remember, patience is a virtue here. Getting all those springs attached might take a little while, but it's worth it for a safe and fun trampoline. Once all the springs are on, the mat should be nice and taut. You've basically completed the main structure of your trampoline at this point. You can find more tips on installing the new mat if you need them.
Installing Safety Features
Alright, so you've got the main structure of your trampoline put together. That's a big step! But before anyone starts bouncing, we absolutely need to get the safety gear sorted. This is where we make sure those springs are covered and that there's a good barrier to keep jumpers on the mat.
Placing the Protective Spring Pad
This pad is super important. It sits right over the springs and the edge of the frame. Think of it as a cushion between the jumper and those metal coils. You want to make sure it's snug and covers everything. Most pads have ties or straps to secure them, so check your manual for the best way to attach yours. A well-secured pad means fewer chances of little fingers or toes getting caught.
Securing the Safety Pad
Getting the pad on right is key. You'll usually lay it over the frame and then tie it down underneath. It's best to do this evenly. Start by tying one corner, then go to the opposite corner, and then the other two. This helps keep it from shifting. You don't want any gaps where someone could accidentally land on a spring. Some pads might have Velcro straps, others might use bungee cords. Whatever your model uses, make sure it's tight and doesn't wiggle around.
Understanding Enclosure Net Installation
The enclosure net is your next big safety step. This is the mesh that goes around the top. It's there to stop people from bouncing off the trampoline. The net usually attaches to poles that stick up around the frame. The way it connects at the bottom is really important too. Some nets have a design that tucks under the mat, leaving no gaps. Others use ropes threaded through loops. The goal is to have no openings where someone could fall through or get stuck.
- Check the Net for Damage: Before you even start installing, give the net a good once-over. Look for any rips, tears, or holes. Even small ones can get bigger with use.
- Secure Pole Attachments: Make sure the poles are firmly attached to the frame and that the net is securely fastened to the poles. This usually involves straps or ties.
- Bottom Attachment: Pay close attention to how the net connects to the trampoline mat or frame at the bottom. There should be no large gaps.
Remember, safety features aren't just for show. They are designed to prevent injuries. Take your time with this part, and if anything seems unclear, double-check your trampoline's specific instructions. It's better to be safe than sorry when it comes to trampolines.
If you're having trouble getting the enclosure net to fit just right, don't get frustrated. Sometimes these things can be a bit fiddly. You might find it helpful to have a second person assist you, especially when stretching the net into place. For more tips on trampoline setup, you can check out general trampoline assembly advice.
It's also a good idea to know how often these safety features might need replacing. While the frame is built to last, nets can degrade over time due to sun exposure. Most manufacturers suggest checking your net for wear and tear regularly and considering replacement every few years, typically around 3 years for optimal safety.
Final Checks and Testing
Alright, you've put in the work, and your trampoline is looking pretty solid. But before anyone takes a leap, we need to do a quick once-over. Think of it like double-checking your work before you hand it in – better safe than sorry, right?
Reviewing All Connections
First things first, let's go back through everything you just put together. Grab your tools again, not to tighten things further, but just to make sure everything is snug. Check all the bolts, screws, and any other hardware. Are they all there? Are they tight? Sometimes, things can loosen up a bit during assembly, especially if you were using a power drill. It's also a good time to look over the frame itself. Any weird bends or cracks that you might have missed earlier? A quick visual inspection can catch a lot of potential problems before they become actual problems.
Performing a Stability Test
Now for the fun part – the stability test. This isn't about seeing how high you can jump just yet. It's about seeing if the trampoline stays put. Gently push and pull on the frame from different sides. Does it wobble? Does it feel loose? If it does, go back and re-tighten whatever seems to be the culprit. You might need a partner for this, just to get a good feel for any movement. If you're happy with how stable it feels, you can try a very light bounce yourself, just to get a sense of how it handles weight.
Ensuring Proper Trampoline Setup
Finally, let's make sure everything is in its right place. Is the jumping mat centered? Are the springs all hooked up correctly and evenly spaced? You don't want one side to be tighter than the other. Check that the safety pad is covering all the springs and is secured properly. If you have an enclosure net, make sure it's taut and attached securely to the poles. A well-set-up trampoline is a safe trampoline. Remember, following the assembly instructions carefully is key to preventing accidents and injuries, so if anything feels off, it's worth revisiting those steps. You can find more tips on safe trampoline use.
This final check is your last chance to catch anything that might have been overlooked. It’s a simple process, but it makes a big difference in how safe and enjoyable your trampoline will be. Don't skip it!
Here's a quick checklist to run through:
- Frame connections: All bolts and screws tight?
- Legs: Firmly attached and stable?
- Jumping mat: Centered and springs evenly attached?
- Safety pad: Fully covering springs and secured?
- Enclosure net (if applicable): Properly attached and taut?
Once you've gone through these checks and are satisfied, your trampoline should be ready for some bouncing fun. Just remember to keep up with regular maintenance checks, too, to keep it in great shape for a long time. For more on general trampoline safety, check out these essential safety tips.
Before you finish, let's do some final checks and testing to make sure everything is perfect. We want you to have the best experience possible. Ready to jump into fun? Visit our website to see all the amazing features and get yours today!
Conclusion
So, you've made it through the assembly process! Following the instruction manual trampoline steps carefully means you've got a safe and ready-to-go trampoline. Remember, taking your time and double-checking each step is key. Now, get ready for some serious bouncing fun!
Frequently Asked Questions
Why is it so important to read the instruction manual for my trampoline?
Reading the manual is like having a map for putting your trampoline together. It shows you all the parts, tells you the order to connect them, and most importantly, points out the safety rules. Skipping it can lead to a wobbly trampoline or, worse, someone getting hurt.
What if I'm missing a part for my trampoline?
Don't panic! First, double-check the boxes and the manual to make sure it's really missing. If it is, contact the company you bought it from. They can usually send you the missing piece or help you figure out an exchange. It’s better to get the right parts than to try and force something that doesn't fit.
Do I really need a special tool to attach the springs?
Yes, you usually do! The manual will mention a spring puller or similar tool. These tools help you stretch the springs enough to hook them onto the frame and mat. Trying to do it with just your hands can be really tough on your fingers and might not get them on right.
How do I know if I attached the springs correctly?
The manual will show you how. The key is to attach them evenly all the way around. If you put on a few on one side and then a few on the other, the mat can get pulled unevenly. It's best to work with a partner, adding springs opposite each other.
What's the purpose of the protective pad that goes over the springs?
That pad is a super important safety item. It covers up those metal springs and the frame edges. This way, if someone accidentally lands near the middle, they won't hit the hard springs. It adds a layer of cushion to help prevent bumps and bruises.
Can I set up my trampoline by myself?
Some parts, like putting the frame together, you might be able to do alone. But for flipping the frame over and attaching the springs, it's really best to have another person. Trampolines are big and heavy, and having a helper makes the job safer and much easier.


0 comments